What are household moving containers, and how do they work?
Household moving containers are delivered to your home, you pack, then the container is picked up and moved—often with flexible timelines across Canada.
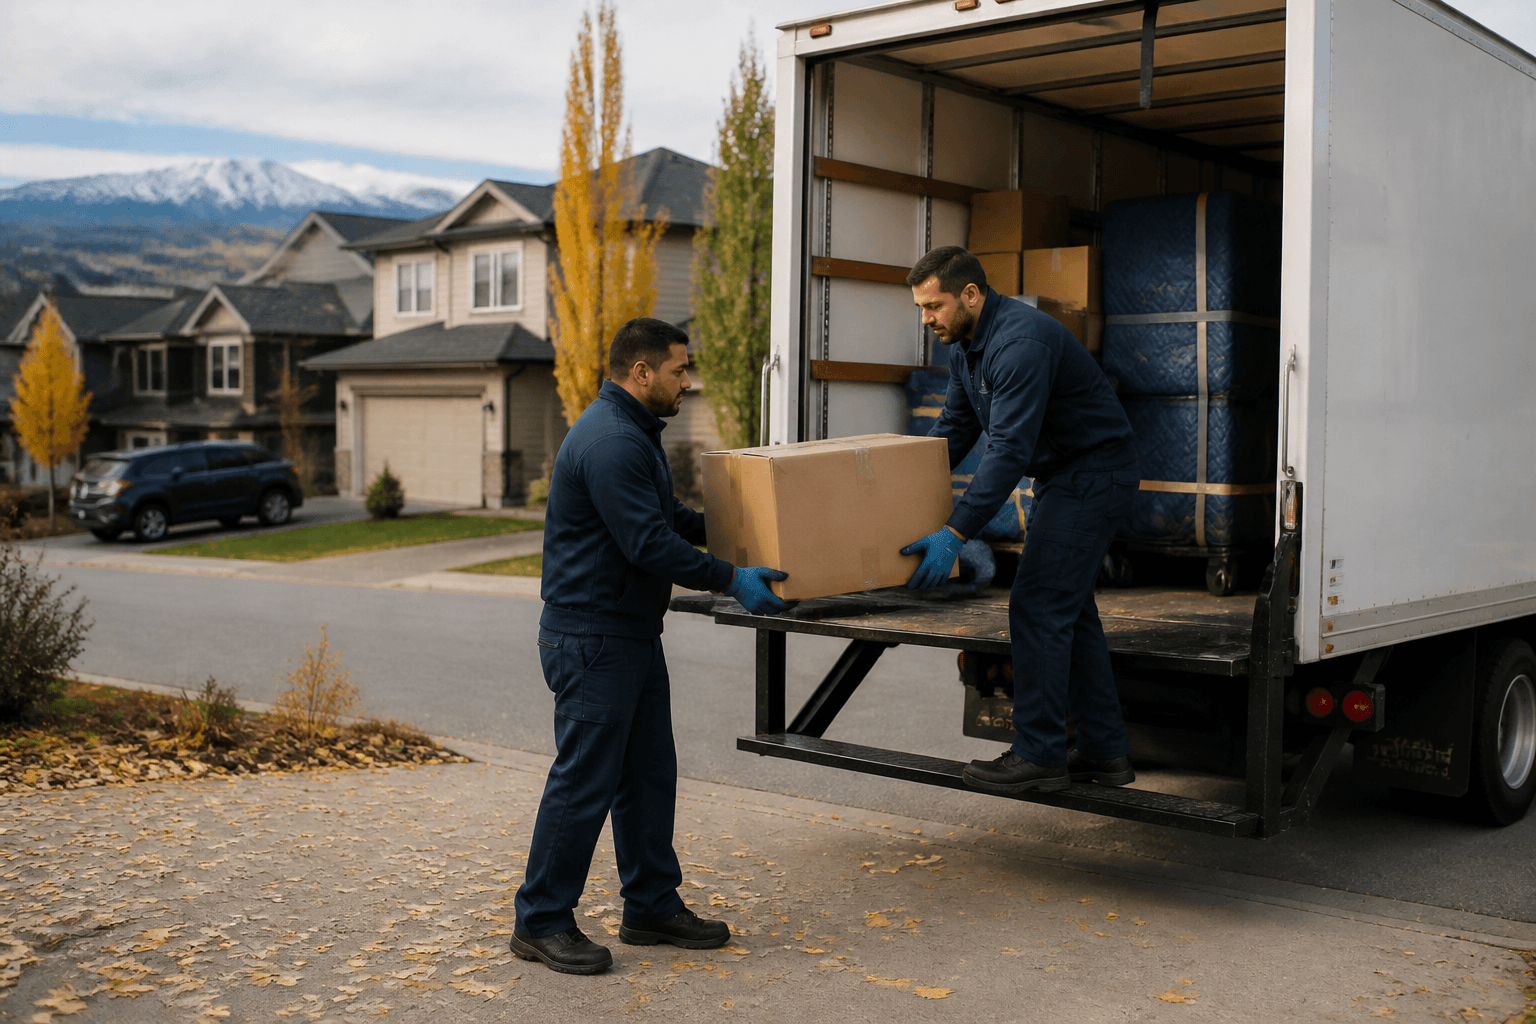
Household moving containers are standardized, lockable storage units designed to simplify relocating a home. In most Canadian “container moving” setups, the company delivers the container to your driveway or ground-level access point, you pack your belongings at your own pace, and then the container is collected and transported to your destination. This model can reduce back-and-forth scheduling compared with traditional truck-and-crew moves, because you’re not limited to one packing window. Depending on the provider and route, you may also get options like temporary storage during transit, multi-day loading, or a choose-your-delivery-day approach.
Across Canada, the key differences are usually container size availability, access requirements (stairs, narrow lanes, or permit rules), and how pricing is structured (one-way transport versus round-trip, storage add-ons, and insurance coverage). If you’re comparing container services in winter—common in places like Vancouver, Calgary, and Toronto—plan for rain, ice, and snow that can affect driveway access and loading speed.
Why Canadians choose containers over trucks or self-storage
Containers can offer a better balance of control, scheduling flexibility, and packing time—especially when home access or move dates are uncertain.
Canadians often choose household moving containers when they need control over packing and timing. Traditional truck moves usually compress packing, load-in, and transit into a tight schedule. Self-storage can also work, but it often adds extra steps: renting storage separately, moving items twice, and coordinating a second loading effort. A container model can reduce that friction by combining “pack where you live” with “one coordinated transport step.”
From a practical perspective, containers can be helpful in urban Canada where parking rules are strict and elevators or loading bays require careful scheduling. Instead of trying to fit a moving truck into a short window, you may be able to load the container at your property with fewer moving parts—especially if your provider can deliver during normal business hours. In less dense regions, containers can still be attractive because you can stage packing room-by-room and avoid repeated trips.
Across the country, the “real” value often comes from flexibility. If your move spans weeks—renovations, closing delays, or tenant handoffs—containers can act like a bridge. If you need interim storage, confirm storage terms, maximum days allowed, and whether your container can be held at a facility before final delivery.
How to pick the right container size for a household move
Estimate your volume by room, not by guesswork—then match it to container sizes and your packing strategy to avoid overflow or wasted space.
Choosing the right household moving containers size is less about square footage and more about how you pack and what you plan to move. Start with a room-by-room inventory: bedroom sets, kitchen small appliances, books, linens, sports gear, and bulky items like mattresses and dressers. Then estimate the volume using “packed” reality—boxes take space differently than loose items, and soft goods (clothes, bedding) compress better than rigid furniture.
Most Canadian container services offer a small number of standardized sizes (commonly “small/medium/large”), but the usable capacity can vary by brand and door openings. Before committing, ask whether the listed size is internal volume or overall dimensions, and whether there’s guidance for estimating volume. For example, a one-bedroom household packed in a tight, organized way may fit into a smaller container than a two-bedroom move where bulky furniture is difficult to disassemble.
Because you can pack at your pace, containers can encourage efficient packing, but they can also tempt you to overfill. Avoid leaving no clearance for secure stacking. When space is tight, prioritize heavier items at the bottom, and disassemble where possible (bed frames, tables, some shelving). If you anticipate uncertainty—renovations or extra boxes—consider whether a slightly larger container is cheaper than paying for overflow solutions.
Costs in Canada: what affects container moving prices
Container pricing depends on distance, container size, access conditions, timing, and add-ons like storage and insurance—always confirm what’s included.
Container moving costs across Canada can vary widely, even when the primary need is the same: household moving containers. The largest driver is usually distance and route complexity. A local move near a major metro area will typically cost less than a long-haul across provinces, and intercity transit can require different handling and scheduling. The second driver is container size; larger units cost more because they take more space and occupy more transport capacity.
Access conditions also matter. If your container must be positioned a certain distance from your door, if there are stairs, or if you have tight driveway constraints, you may face additional labour or scheduling complexity. In many regions, permits may be required for loading and driveway placement, particularly in dense urban areas. While exact fee schedules differ by provider and municipality, the practical takeaway is that “easier access” often means fewer add-on charges.
Finally, check add-ons: storage days, insurance coverage, packing services, and any special handling for fragile items. Many providers offer basic coverage and additional options; request the policy details, claim limits, and exclusions so you know what “covered” means in real terms. For planning, also consider timing—weekends and peak season can affect availability. If you’re moving in winter, factor potential delays from weather disruptions, especially in regions prone to ice and snow.
Packing best practices: protect valuables and maximize space
Use sturdy boxes, proper cushioning, and a clear labelling system—then load in a way that prevents shifting during transport.
Packing is where household moving containers deliver their biggest advantage: you can take your time and pack with care, not just speed. Start with the right materials. Use quality moving boxes (not just any thin packaging), wrap fragile items individually, and protect corners and edges with padding. For dishes, glassware, and collectibles, use dividers when possible and pack “tight” so items don’t rattle. For electronics, keep cables coiled or bagged, label each device, and pack screens with protective wrap.
To maximize space, build stability inside the container. Heavy items should go on the floor first, and softer goods can fill gaps to reduce movement. Create a “wall” of boxes along the sides and pack toward the middle, leaving space for airflow and safer stacking. Don’t over-compress fragile stacks; when things are squeezed, damage risk increases. Keep essential documents and valuables in a separate, easy-to-access box rather than buried at the bottom.
Labelling matters for unloading efficiency. Use a simple system: room + category (e.g., “Kitchen—small appliances,” “Bedroom—linens”). If you’re moving across provinces, consider climate impacts. In damp winter conditions, keep moisture-sensitive items in sealed bags and avoid placing items directly against container walls if condensation occurs. Ask your provider about container ventilation and recommended moisture protections for stored moves.
Delivery, loading, and timing: what to plan before the container arrives
Prepare access and schedule checkpoints early—winter conditions, driveway placement, and final delivery timelines can change how smoothly your move goes.
A smooth container move depends on details before the container arrives. For household moving containers, confirm placement location, maximum setup time, and the expected delivery window. If you have a driveway, ensure there’s sufficient clearance for safe positioning and that snow or ice is manageable. In winter across Canada, precipitation and freezing conditions can affect wheel traction, and providers may need additional time for safe drop-off and pickup. If you’re in a condo complex, loading rules can require coordination for elevator booking, loading-bay access, or designated times.
Next, plan your staging area. Clear a path from your door to where you’ll pack boxes—reducing trips during rainy or snowy weather. Identify bulky items that may require disassembly or special handling (mattresses, large TVs, wardrobes, or dining tables). Decide in advance whether you’ll move items to the container continuously or in rounds; either approach works, but a predictable workflow usually helps when crews coordinate the container handoff.
Timing is also critical for household transitions. If you’re bridging a lease end date, confirm when your container can be held and the maximum duration included before storage fees apply. Ask the provider to outline the pickup-to-delivery timeline and any “target window” language. Finally, prepare for the essentials box—set aside bedding, basic kitchen supplies, and toiletries—so you can resume normal life quickly when the container is delivered.
Insurance and damage risk: how to verify coverage before you pack
Confirm what’s insured, what isn’t, the claim process, and how to document condition—so you’re protected during transit.
Insurance is a must-check when choosing household moving containers. Even with careful packing, transit can include vehicle vibrations, container handling, and temperature swings that may affect certain materials. Before you seal boxes, review the provider’s insurance or liability terms. Some services include limited basic coverage, while others require you to purchase additional protection for full replacement value. Don’t assume coverage based on “professional handling”—read the claim conditions.
Ask specific questions: What is covered (typical categories like transport damage, damage due to improper packing, or weather-related issues)? What’s the valuation method (actual cash value versus replacement cost)? Are there exclusions for high-value items, certain fragile categories, or items packed outside recommended materials? Also request the process: how soon you must report damage, what evidence is required (photos, inventory lists), and where claims are submitted.
Practical steps can improve outcomes. Document the condition of the container at delivery and before pickup, and keep your packing receipts where possible. Create a simple inventory list with counts per room. For high-value items—jewellery, documents, art, antiques—consider specialist coverage or separate high-security packing and keep it with you if the provider allows. With clear coverage and documentation, you’ll reduce uncertainty and strengthen your ability to resolve issues quickly.
Frequently Asked Questions
Do household moving containers work for apartment moves in Canada?
Yes, household moving containers can work well for apartment moves in Canada, but success depends on building access and loading logistics. Unlike moving trucks that require strict arrival timing, containers can sometimes be delivered and picked up in scheduled windows that fit building rules. Before booking, confirm where the container will be placed (driveway, loading bay area, or street-permit zone) and whether the building requires permits, insurance certificates, or prior notice. For condos and rentals, ask if there are elevator booking requirements, maximum loading times, and restrictions on moving furniture during quiet hours. In winter, building management may also restrict loading during icy conditions or require safer walk paths.
To keep the move smooth, plan an efficient pack-to-load workflow. Stage boxes near the entrance you’ll use most, label clearly by room, and group heavy items so they can be moved quickly. If you’re moving between provinces, also confirm whether the provider can store containers briefly at a facility if your building closing date and move-in date don’t align.
How long can my container stay packed before pickup?
The allowed time for household moving containers varies by provider and depends on whether your container is treated as a “one-way transport” service or includes temporary storage. Some companies may allow packing for a set number of days before pickup without extra storage fees, while others may charge storage after a threshold. Because terms differ across Canada, you should request the exact “pack window” and the first day storage fees begin, if applicable. Clarify how the clock works—delivery date versus the day you finish loading—and ask whether weekends are included.
If you’re moving due to renovations or closing delays, treat the packing window as a planning constraint, not a guess. Many people only realize they need extra time after they discover what doesn’t fit, which is why it’s helpful to do a quick inventory and test-pack a few items early. If you suspect delays (common during winter weather or construction schedules), confirm whether the provider offers a flexible extension option, and what the per-day rate is after the included period. With a clear timeline, you can avoid unexpected costs and reduce last-minute rushing.
What’s the best way to estimate how many boxes I’ll need?
To estimate boxes for household moving containers, start with a room-by-room inventory and convert it into “packed” box counts based on typical household categories. Create piles by room: kitchen, books, bedroom linens, small appliances, and miscellaneous items. Then choose box sizes you’ll use consistently. For example, books often require smaller, sturdier boxes because of weight; linens and clothing can go into medium boxes with padding; fragile items should go into smaller boxes with separators. The goal is to approximate how your belongings will physically stack inside the container, not just how many items you own.
A simple method: count major furniture items and estimate their boxed components (e.g., dressers not boxed at all, but lamps and accessories boxed). Then estimate the number of boxes per room: many households land on predictable ranges after a quick audit. For cross-country moves, remember that packing materials can take space too—bubble wrap, padding, and sturdy cartons. Keep a “materials box” for tape, markers, wrap, and protective supplies.
When you’re unsure, ask the moving-container provider whether they have a packing guide or sizing calculator. Reputable companies often provide practical estimates based on household size, and they can recommend whether to choose a slightly larger container to avoid overflow. Avoid overstuffing boxes; it increases breakage risk and makes loading harder.
Are moving containers weatherproof, and how do I protect items in winter?
Household moving containers are typically designed for transport and everyday outdoor storage, but weatherproofing doesn’t always mean “no condensation.” In winter across Canada—especially in coastal and high-humidity areas—temperature swings can create moisture inside enclosed spaces. That can be a concern for items like paper documents, photo albums, electronics, leather, and fabrics. Ask your provider about the container construction and whether they recommend specific moisture controls.
To protect valuables, seal sensitive items in plastic bags or airtight bins, and keep them off the container floor if possible by using pallets or dry boards (if your provider allows). Use desiccant packs for humidity-prone items, and wrap electronics thoroughly with protective material. For winter moves, avoid packing wet blankets or damp clothing; fully dry items first, then pack. If condensation occurs, let the destination container acclimate before unpacking delicate goods.
Also consider how you stack. Don’t place loose items that can crush against fragile stacks, and keep heavy items stable at the bottom. For documents and important records, keep them together in a clearly labelled “essentials/documents” box packed early. With the right moisture strategy, you can reduce winter-related issues even when your move spans cold days and variable conditions.
How do I handle fragile items and high-value belongings?
Fragile and high-value items require extra planning with household moving containers because you’re packing at home and sealing the container before transit. Start with a packing checklist: individually wrap glassware and dishes, use cushioning for corners, and pack heavier fragile items on the bottom of their box. For collectibles, consider double-boxing—placing the item in a smaller box with padding, then placing that box inside a larger carton with additional shock absorption. Use dividers for dish sets when available. Label boxes clearly as fragile and keep them away from areas where they could be bumped.
For high-value items like jewellery, art, or critical documents, confirm coverage and consider whether separate protection is available. Some providers offer increased coverage for declared items or allow you to arrange specialty transport. If your policy requires specific packing methods, follow them closely and keep photos of the item condition and the packing process when feasible.
Finally, create an inventory list with approximate values and locations by room/box number. If a claim is ever needed, this documentation speeds up resolutions. The best outcome comes from combining careful packing materials, clear labelling, and knowing what the insurance terms cover.
Can I pack my container myself, and do professional packers improve results?
In most household moving container services, customers can pack themselves, and that’s often part of the appeal. Packing at your pace lets you take care with fragile items and manage family schedules. Many providers supply general packing guidelines, but they usually don’t force a professional packing crew for standard household loads. Doing it yourself can be cost-effective—especially when you use quality moving materials and a clear labelling system.
However, professional packers can improve results in specific situations. If you’re moving large volumes, have many breakables, or have limited time due to work or winter weather constraints, trained packers can reduce damage risk by using standardized packing methods and robust box selection. Professionals also handle awkward items like mirrors, artwork, and disassembled furniture with more consistent packing density and stability.
Before choosing, ask whether the container provider offers packing services, what they include (materials, custom crating, and inventory tagging), and whether the service affects insurance coverage. Even if you pack yourself, use the same discipline you would for a high-stakes item: correct box sizes, proper cushioning, and avoiding overpacking. The best results come from consistency—whether it’s you or a team.